Follow me on Pinterest

Follow Me on Pinterest

Monday, 30 May 2016

I think Mrs Steffenson is having a...

My gorgeous class had fun predicting the gender and name of Baby Steffenson today. 

We incorporated this activity with a Maths lesson on collecting data and recording the information on a graph.

It was interesting to see their predictions... I wonder who will be right? 


After the Maths lesson we completed a follow up writing activity where children were asked to predict the: 

•Gender of the baby
•Name of the baby 
•Size of the baby 
•Eye colour of the baby 
•Hair colour of the baby

They were also given the opportunity to draw the baby.

The children had a lot of fun coming up with their answers and I had a lot of fun discussing their answers with them!


Not long to go now!


Wednesday, 4 May 2016

Mothers Day

My little class have successfully completed their Mothers Day gifts to take home to their mummies on Sunday. 

This was a simple but effective activity using buttons. 

I typed up the writing and the lines on A4 card paper and stuck the large buttons on with craft glue.

Students then wrote a message to their mum from a modeled writing lesson. 


I copied this cute little poem onto
 pink paper.

Children then dipped their thumb onto a stamp pad and left their mark on the paper. 

I then laminated it, put a hole through one end and tied a ribbon to it to make a bookmark. 

I think the KS mums will gets a nice surprise on Monday. 

Thursday, 17 March 2016

Happy St Patrick's Day

🍀 Happy St Patrick's Day 🍀

Today in KS we made leprechauns!

First, cut a paper plate in half.

Paint the edge of the paper plate orange (this is the beard). I used a sponge for faster and easier application. 


Draw a hat template, copy onto green card and add it to the top of the plate. 

Cut small pieces of yellow paper and add to the hat buckle. 


Draw a black square in the middle of the yellow piece of paper and colour the band of the hat black.


Finally, add eyes (template found online) and draw a smile.


Monday, 14 March 2016

Ladybug Maths

Ladybug Maths 

Activity: Firstly buy a packet of red plastic/paper plates (or paint white plates red). 

Then draw a line down the middle of the plate using a marker pen (this is the wings).

Use round coloured stickers for the spots.

Draw a head template on red card (children can draw the eyes).

Discuss numbers 1-10. This is a good
opportunity to discuss 'Friends of 10' if your students are ready for this concept.

Have the children put 10 spots on their ladybugs and staple the head on.

Complete the worksheet (link provided). 

https://www.teacherspayteachers.com/Product/Ladybug-Spots-Count-to-10-Friends-of-10-Trace-Copy-Write-2446493

Children ready, copy and write the sentence 'My ladybug has 10 spots' and then trace and write the numbers 1-10.

My class really enjoyed this activity!


Wednesday, 24 February 2016

Exciting News!

It's been a little while since I last posted on my blog, but I have been super busy with the start of the new school year. 

My husband and I are also having our first baby! 

We are over the moon with excitement. 

Baby Steffenson is due in June and we can't wait to become a mummy and a daddy. 

I will miss my little class when I eventually go on Maternity leave, but am very much looking forward to the future addition to our family. 

This week has been a busy week at school with our class Parent/Teacher night.

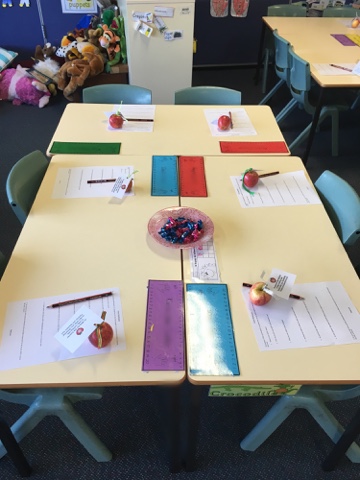
Here are a couple of photos of my room before the parents arrived: 


Lollies were provided for that much needed sugar hit!

A questionnaire (from one of my colleagues) was given to the parents to fill in on their arrival. The questionaire is a great way to break the ice and for me to gauge more of an understanding of the children in my class.

Each desk had an apple on it (for the cute factor of course) with the tag attached saying "An apple for the teacher is really nothing new, except when your remember parents are teachers too". I found this little poem online and have used it over the past few years on Parent Teacher nights. 

The night was successful and it was lovely to meet my new class parents for
the year. 


Wednesday, 2 December 2015

Dreaming of a white Christmas...

Today I was inspired to make some gorgeous snowmen with my little class after I saw photos of family in Minnesota making snowmen and playing in the snow... 

I drew the template of the snowmans body on white card. 

I then drew a triangle shape on orange card for the carrot nose. 

The children cut both of these out and stuck them onto black cardboard. 

Using two strips of red and green paper we created a scarf.

The children then snipped the end of the scarf to create a frayed look.

I gave the children a marker pen and they created their snowmans mouth. 

Finally, we used white paint and cotton buds (cue tips) to make the snow. 

The result... a super cute snowman looking into the sky at the falling snow! 


Tuesday, 1 December 2015

Let it snow, let it snow, let is snow globe!

Today my gorgeous class KS created the most wonderful snow globes. 

We used our imaginations to think about what our lives would be like if we lived  inside a snow globe. 

They children came up with many interesting ideas! 

As we have been learning about the senses I was able to incorporate this into the lesson. 

On the base of the snow globe the children were asked to think about what they would see, hear, smell and feel living in the snow globe. 


I then cut out the centre of plastic plates and stapled them on to black card paper.

The children then pasted the bases underneath the plastic plates.

I took photos of the children and they stuck them inside the bowl (globe). 

Using a cotton bud (cue tip) the children dipped one end into white paint and dotted the 'snow' on to the middle of the globe around their photo. 

I was very pleased with how they turned out!